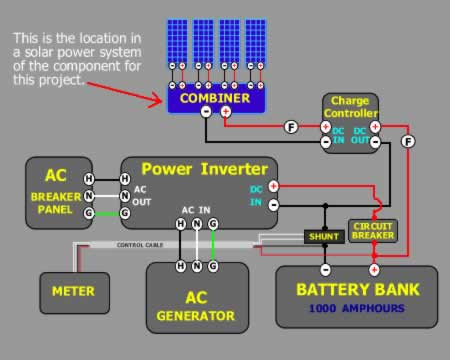
| A solar combiner box combines several solar panels into 1 DC output to connect to the charge controller. This is sort of the reverse of what a typical home AC circuit breaker panel does, which takes 1 AC input and distributes it to several AC circuits. |
| So, we are going to use a standard AC circuit breaker panel and modify it to create the combiner function. The main reason for this project is that a typical solar combiner box can cost hundreds of dollars and this project will show you how to easily contruct one that combines 6 solar panels for $33.79 or 12 solar panels for $68.17 (Home Depot prices as of 11/1/05). Much cheaper and just as safe and effective. |
| The diagram below of a typical solar power system shows the component for this project installed between the solar panels and the charge controller. |
|
|
|
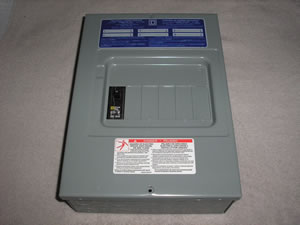 |
We start with a typical AC circuit breaker panel (shown here with 1 single circuit breaker installed). The one I chose is available at Home Depot for $15.97 : (model # HOM612L100SCP by HomeLine). It has 6 slots for up to 12 circuits using 6 inexpensive SQUARE D type single or double circuit breakers. If you use the double breakers, the 6 standard circuit breaker slots become 12. The single breakers cost $2.97 and the double breakers are priced at $8.70 as of 11/1/05. |
|
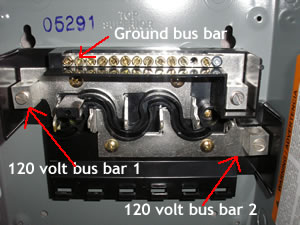
| Step 1: Identify the connections. Like most typical AC breaker panels, this one is set up for 120/240 volts AC. The modification we are going to make is to connect both 120 volt bus bars together. I have shown them here as bus bar 1 and bus bar 2. Normally, you would connect from the ground (neutral in AC terms) bus bar to either 120 bus bar for a 120 volt circuit. For a 240 volt circuit you would use a larger circuit breaker that would connect across bus bar 1 and bus bar 2 providing 240 volts. We are going to just connect them together to act as the positive terminal of all the solar panels. |
 |
|
| Step 2: Jumper Bars 1 & 2. Simply connect a copper wire from bus bar 1 to bus bar 2 as shown. If you are planning on 6 solar panels, use 8 to 10 gauge wire. For 6 double breakers (12 solar panels), use 6 to 8 gauge wire. For 70 watt or smaller panels, you can use the lower gauge. For over 70 watt panels, I recommend using the higher gauge wires. The two bus bars now wired together become the positive (+) voltage connection for all of the solar panels. The AC neutral bus bar (I call it ground for our purposes) will of course be the negative (-) voltage connection. |
 |
|
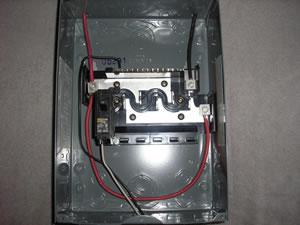
| Step 3: Connect the output wires. Next, we will connect the main output connections. These are the plus(+) and minus(-) wires that connect to the input of the Charge Controller. Connect a red wire to the positive(+) terminal (bus bars 1 & 2) and a black wire to the negative (-) terminal (the ground or neutral bar) as shown on the right. These 2 wires will carry the full current for all the solar panels. |
 |
|
| Step 4: (single breakers for up to 6 panels) Now to install the circuit breakers. Install a single circuit breaker into position. Connect two wires from the first solar panel. I used 12 gauge solid copper house wire; white for positive and black for negative. Connect the white wire(+) to the screw terminal on the circuit breaker itself. Connect the black(-) wire from the solar panel to any screw terminal on the ground bus bar (neutral). I have shown just one installed and wired here. Just repeat this for up to 6 solar panels. |
 |
|
| Step 4: (double breakers for up to 12 panels) If you use the double circuit breakers, just connect the positive wire from the first solar panel to the first screw terminal on the circuit breaker itself. Connect the negative wire from the first solar panel to the ground bus bar (neutral). Then connect the positive wire from the second solar panel to the second screw terminal on the circuit breaker. Last, connect the second negative wire to the ground bar (negative terminal). I have shown just one double breaker installed and wired here for 2 solar panels. Just repeat this up to 6 times for a maximum of 12 solar panels. |
 |
|
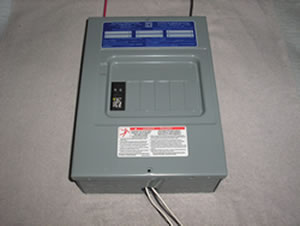 |
That's it, your done! Here I have shown the AC panel with the cover installed and one double circuit breaker installed. This setup is for 2 panels. With this simple project you now have an inexpensive solar combiner for up to 12 solar panels. By the way, the smallest circuit breakers you can buy are usually 15 amps. That is more than large enough for each solar panel. Another advantage of this project is that you can turn on the solar panels one at a time to verify that they are all working properly. |
|
DISCLAIMER : Alway make sure that all of your equipment is properly fused and grounded for safety. Also, be sure to read and follow the advice and instructions that come with your equipment. While projects have actually been constructed and tested under actual operating conditions, we do not guarantee that they will meet all electrical codes in all locales. Nor do we suggest that our advice supercedes the recommendations of a licensed electrician. Hey, we're just trying to help!